Showing posts with label cake pops. Show all posts

Friday, July 3, 2009

The Fourth

Freedom, independence & a marine named Carlos. Last week I was trying to decide what kind of Fourth of July sweets to make or if I was even going to make anything at all. Then I received an email from a reader's boyfriend and I knew I wanted to… had to… do something for the holiday.

Here's his letter. And by the way, I couldn't make anything sweeter than this.

Hi there Bakerella!

My name is Carlos and I'm a United States Marine, and have been one since 1998. If you wouldn't mind just giving my e-mail some thought, I'd be grateful. Here's the story:

My girlfriend just went away to Marine Corps bootcamp not yet a month ago. She LOVES to bake, but unfortunately didn't get much time to do so because her job took up most of her free time, so she lived vicariously through you. She's a fan of photography also, so your blog was a welcome reprieve from a long, hard day at the office. As you may or may not know, bootcamp for Marines is 13 weeks long; the only contact with the outside world is through snail mail. I miss my girlfriend immensely and while I know she's doing something for her country that she's always wanted to do, it's hard on me. I digress, she loves your blog. I know the 4th of July is coming up and I ask you this not only for her, but also for the men and women in the Armed Forces who really know and FEEL the meaning behind this holiday. I think it would be very patriotic and meaningful to bake and decorate something in the spirit of the military, not just flags and sparklers like everyone else is doing - but something to show people that our military needs support and we need to remember them while we're lighting off fireworks at the family BBQ. You know?

Now, I'm asking this because I think it would touch a special place in some of your reader's hearts. I'm willing to bet you have quite a following amongst military wives and/or girlfriends. How nice would it be to show your support? I've served 3 tours in Iraq and am due to go to Afghanistan for a year in the next few months. I won't get to see my girlfriend graduate from bootcamp in September, I won't get to see her looking sharp in her uniform, I won't get to see the pride on her face as finally, at 28 years old, she joins the ranks of The Few, The Proud... so this would be my chance to show her I thought of her. This is your chance to show you think of our military, as many others should be doing. Maybe it'll get people to look for ways to support us with baked goods? During the colder months overseas, my girlfriend would bake cookies and anything else she could that would hold up to the travel and heat, and send on enough for my whole platoon. A taste of home, a taste of love... opening up a box with the smells of back home was something you just can't explain. It was magical. My girlfriend didn't stop there though, she adopted Marines, Soldiers and Airman through Anysoldier.com and sent them care packages and notes of encouragement.

I realize I'm all over the place here, but trying to get my point across is difficult without writing you a novel. I think you get the gist. 4th of July is about more and I'd love to write my girlfriend a letter and say, 'Bakerella appreciates the Armed Forces, when you get back to the real world and have access to a computer... go see her 4th of July post.' Now, I don't know if you'll do this or not and it's fine either way. I just wanted to tell you a little story and hope that maybe a tiny blurb in your blog would entice your readers into caring just a tiny bit more and thinking just a bit deeper on our Independence Day.

I appreciate your time in reading this!

Carlos

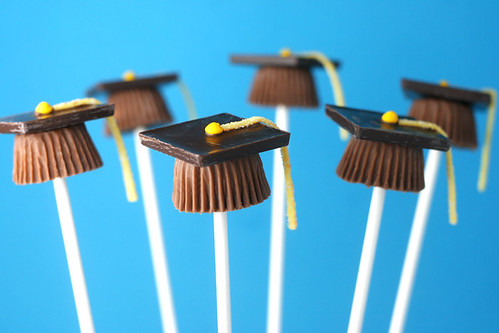
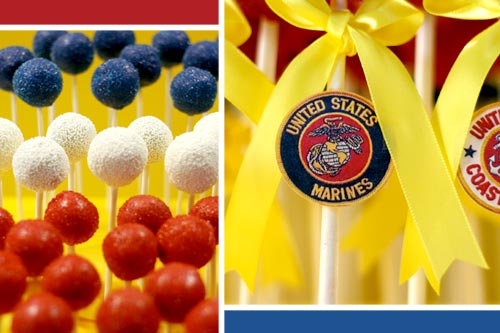
What a sweetheart. When I read his letter, I immediately wanted to make and send something to surprise his girlfriend. I thought, how cute would it be for her to open a box of colorful cake pops! Then, Carlos informed me that they can't receive food during boot camp. I pictured her being forced to eat all the pops at one time and then made to run 10 miles or something. I don't think she'd like that too much. Picture it. Cute little cake pops. Marines. Lollipop sticks. Marines. Sprinkles. Marines. Not the best idea for her sake.

Now, I can't send her anything sweet, but I can send her these sweet simple words of appreciation.

Military Pops

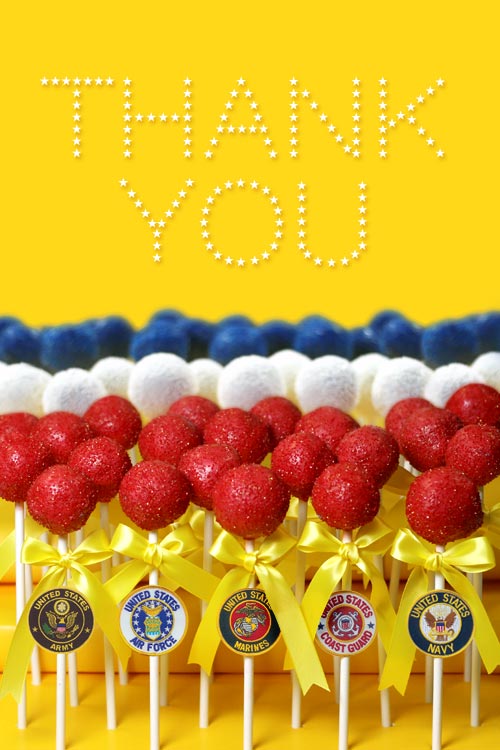
It's not much, but I hope that if you do see this when your 13 weeks of boot camp are over, that it puts a smile on your face. And know that you and all members of the armed forces were thought of this July 4th.

Plus… that Carlos… he sounds like a keeper.

Cake Pops

Marine Pops

Cake Pops

What about you? Is there someone on your mind… or in your heart… this holiday?

Hope you all have a happy, safe and sweet Fourth of July!

Saturday, May 30, 2009

Cheesecake Pops!

Cheesecake Pops

Okay, be honest. How many of you saw this coming? After last week's cheesecake success, It was finally the perfect opportunity to give these little treats a try. The first time I remember seeing them was April, a year ago. I remember because I had not been home long after showing Martha how to make Cupcake Pops. I was looking at some of my favorite blogs and everywhere I looked, I started seeing chocolate covered balls on sticks. I mean everywhere. I was like, holy cow, Martha really has some heavy mojo. Then, I laughed at myself when I realized, Martha and I had nothing to do with it. The pops I was seeing were part of a Daring Bakers Challenge where tons of bloggers tackle a new dessert each month and that month they had coincidentally picked cheesecake pops inspired by the book Sticky, Chewy, Messy, Gooey. Well, I finally saw this book a couple of weeks ago in the bookstore, and I had to immediately have it. Let me just tell you, it is a feast for your sugar-loving eyes. When I flipped through it again last weekend, I was reminded of all those beautiful cheesecake pops and it seemed only natural for me to finally give them a go.

And, it didn't hurt any that I had half a plain jane cheesecake sitting in the refrigerator waiting to be experimented on.

Cheesecake

I used a small ice cream scoop and scooped up as many balls as I could, trying not to scrape the graham cracker crust into it. I didn't want it to look ugly, you know. I guess, if I was going to make these on purpose, I would bake my cheesecake in a regular 2-3" high cake pan and not use a crust at all.

Scooped Cheesecake

I got 12 easy, from half of the cheesecake. I could have probably squeaked out a couple more, but I might have eaten a few sections of cheesecake along the way. Maybe.

I didn't really roll these, but I did kind of shape them a little to make them more round.

Cheesecake Balls

And, then because they were lumpier than I am used to with the cake pops, I dropped each one in a small bowl filled with graham cracker crumbs and rolled it around to coat. This helped to shape them better as well.

Then, I popped them in the freezer for a few minutes to firm up. (Maybe about 20-30 min. for these.)

While they were chilling. I heated up some chocolate candy melts in the microwave (30 sec intervals, stirring in between) and got my sticks and decorations ready.

Sprinkles

I went with teeny tiny hearts in red, white and pink. A hearts and jimmies mix in red, white pink and brown … and also just some dark chocolate that I chopped up in a mini food processor.

Note: I'm pretty sure a few of you are going to want to know where those baking cups came from. Check out www.confectioneryhouse.com

So, after the balls became firm, I dipped one end of my lollipop stick in some of the melted candy coating and then inserted it into the cheesecake ball. I immediately dunked the pop in a deep bowl of melted candy coating and then sprinkled to decorate. Each one was then placed in a styrofoam block to completely dry. Then, they went in the refrigerator to await their fate.

Note: It will really help if you use a bowl that is deep enough to completely submerge the pop in chocolate and remove in one motion. It also helps if your chocolate is on the thinner side. (You can melt a little shortening in it to thin it out some.) Once, you remove it, carefully tap the excess off while balancing the pop on the stick. You may need to rotate your hand so that gravity keeps the pop in place long enough for the chocolate to start to set around the base. Add the decorations before it sets too much also or they won't stick to the surface. These were slightly harder to manage than the cake pops. One… they were larger and heavier because of using the scooper. Two… the cheesecake texture wasn't as sticky as the cake pop mixture.

But… I think they turned out beautifully.

Let's take a closer look…

Cheesecake Pops

A little closer.

Cheesecake Pops

Closer.

Cheesecake Close-Up

Whoops, just couldn't resist. YUM-O-RAMA!

So, you say you don't want to do a balancing act to make all these on sticks. Here's another way you can do it. And it's easier.

Cheesecake Pops

Take your graham cracker-coated cheesecake ball and drop it in the bowl of melted candy coating.

Cheesecake Balls

Don't stir it. Just spoon some chocolate over the top until it is covered. Then, scoop it out with a spoon and tap off some of the excess by tapping the spoon on the side of the bowl. Then, just let it slide right off onto some wax paper. Insert your stick and add any decorations. Told you this was easier. I didn't tap these as much as I do regular cake balls because I was going for the Sticky, Chewy, Messy, Gooey look that Jill O'Connor shows in her book.

Cheesecake Pops

Messy looks good, too, don't you think?

If you want to make some Cheesecake Pops … you will need:

Cheesecake (Buy one if you want to get straight to the fun stuff. Shhh… I won't tell. You can also use this recipe.)
Mini ice cream scoop
Chocolate candy melts
Sprinkles
Lollipop sticks
Wax paper
Dark chocolate, chopped
Graham cracker crumbs
Dipping bowl
Styrofoam block

and…

Sticky, Chewy, Messy, Gooey if you want to feast your eyes on more messy yumminess.

You can also check the Google results for the Daring Baker's Cheesecake Pop Challenge and see tons more versions to drool over.

Enjoy!

Sunday, May 3, 2009

Candy Cup Caps

Stuff

Can you guess what I'm going to make with all this stuff?


Candy Cup Caps

Little bitty candy cup graduation caps. That's what.

I don't even know anyone that's graduating this year. But, because so many of you asked… here they are and hope you like…

Rainbow Candy

Airheads Extremes Rainbow Berry Sweetly Sour Belts! Ummm… Can you say mouthful? When I found these in the candy aisle at the drug store, I had to grab them. I knew I could find something fun to do with them.

Rainbow Candy Belts

And besides… they're just plain pretty!

Rainbow Candy

These were definitely the inspiration for the graduation caps. They make perfect tassles and give you color choices at the same time. Just cut apart each color strip with a knife.

Reese's

Now, grab a bag of miniature Reese's peanut butter cups. But, before you unwrap them, stick them in the freezer for a few minutes. It will make it easier to remove the wrapper and keep the sides looking pretty when you do.

Reese's

If you remove the wrappers while the candies are room temperature, the sides sometimes come off with the wrapper like this. But that's okay, because these rejects taste good.

Reese's

After you unwrap them, place all the cups on a sheet of wax paper and let them get back to room temperature. When the chill is gone, dip the end of your lollipop stick 
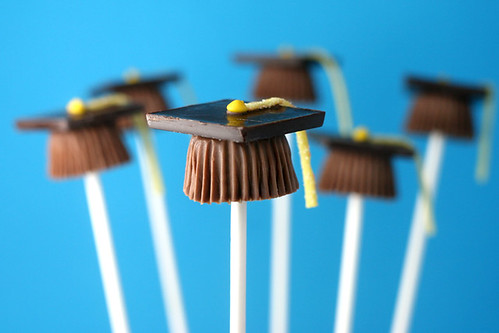
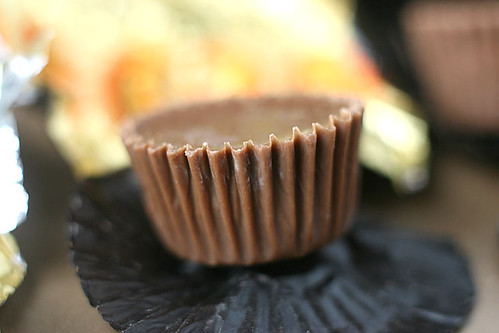
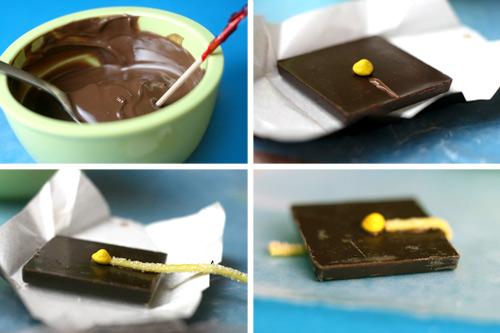
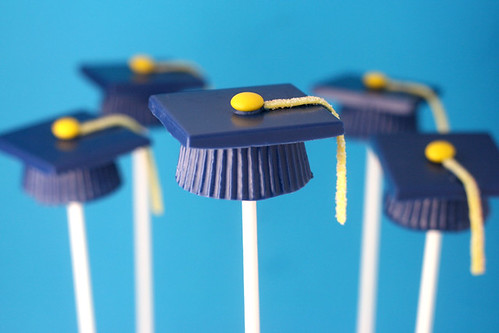
in some melted candy coating and carefully insert into the candy cups. If they are too cold, the cups will split apart. Just insert the sticks about halfway and let dry.

Caps

Now, work on the tops. I used these small Godiva chocolate squares. They aren't the cheapest little things, but the proportions were perfect and because they were individually wrapped, the edges were clean. I found them at a store called the World Market a while ago. Just draw a thin line of candy coating on top with a toothpick and glue on a short piece of the candy belt and a rainbow chip sprinkle in the same color to match.

Candy Cup Caps

When the tops are dry, glue them on the candy cups using some more of the candy coating and insert into a styrofoam block to finish drying.

Cute!

But, wait a minute. What if you don't want brown graduation caps?

Or maybe you're just dying to do the whole cake pop thing. Well, you're in luck.

Graduation Cake Pops

Grab some colored candy melts and get your hands on one of these square candy molds.

Pour some melted candy coating in each square and then drop it on the counter several times to flatten/smooth out the chocolate. Put them in the freezer for a few minutes and it will be easier to pop them out of the molds.

Graduation Cake Pops

You can also use one of these medium size candy cup molds. I've shown them before with the Cake Bite Method. Just fill the bottom of the cup with some melted candy. Place small, chilled cake ball shapes (smaller than the width of the mold) and push them into the candy coating until the coating inches up the sides. That one on the right is how they look for the Cake Bite Method, but for these they should be almost flush with the height of the molds.

Graduation Cake Pops

Then, cover the exposed areas with more melted candy coating. When covered, insert lollipop sticks about halfway in. By the way, using chilled cake balls here helps the sticks stand up straight when you insert them. Then place these in the freezer for a few minutes and when dry, they'll pop out relatively easy. Don't try to pull them out by the sticks, though. Push them out by pressing on the mold underneath.

Then, you can glue everything on. Instead of rainbow chip sprinkles, use a mini-size m&m because these hats are larger in size than the Reese's version.

Graduation Cake Pops

And there you have it… Colored Candy Covered Cake Ball Caps!

P.S. If you can't find Airheads Extremes Rainbow Berry Sour Belts, then try pull apart Twizzlers. They are bigger and round, but if you cut them in half, I think you can glue them, flat side down.


Candy Cup Caps

Mom & Pops

Flower Cake Pops

Mother's Day is next Sunday, so I thought this was as good a time as any to experiment with some Flower Cake Pops. And, I had a bunch of leftover Bunny Candy Corn to get rid of, too. In addition to bunny ears, they make great pastel petals don't you think.

Flower Parts

I'm going to pretend that all of you that made the bunny pops still have these handy, too. You'll need 8-10 pieces for each flower.

Make your cake pops following the basic cake pop instructions, but instead of shaping the pops into balls, make them more oval-shaped with one end flat so you can glue the flower parts on. Also, if you don't want to make the entire recipe into flowers, you can divide the baked cake into fourths and freeze the unwanted sections for later use. Yay!

12 cake pops = 1/4 9 X 13 cake
24 cake pops = 1/2 9 X13 cake
36 cake pops = 3/4 9 X 13 cake
48 cake pops = One 9 X 13 cake

Man… I'm good at math.

Make sure you divide the frosting appropriately also.

Dip the pops in the color candy melts you want for your base. I used white here because it blended in with the white part of the candy corn and camouflaged the gaps a little.

Once dipped, let the cake pops dry standing up in a styrofoam block.

When dry, dip the flat tops back in some of the melted candy coating. This will act as the glue. The coating should be starting to cool off so it takes less time to dry when you attach the pieces.

Now for the balancing act.

Lightly grip the cake pop in your left hand, so your thumb and forefinger can act as a ledge for the candy corn to rest on when you attach them to the top of the pop. If you can do this without letting your hands touch the sides of the cake pop… even better because your body heat can start to melt the sides if you're not careful. It helps a little to let the lollipop stick rest on your leg if you are sitting down.

I know. I know. Sounds like a lot of work. But, I had come this far and they were for… you know… the person who gave birth to me.

Hold them in place long enough for the pieces to set/dry in place and not slide down the side of the pop… which will happen if you remove your hand too soon. Did I mention that this was an experiment? Anyway, when attached, place a tiny bit of candy coating in the center and attach the yellow candies to finish off the flower. Right about here, I realized how happy I was that I decided to only make a dozen of these.

Another method is instead of dipping the top of the pop in candy melts is to apply one petal at a time by dipping the bottom of the candy corn in some of the melted candy coating and then glue it to the top. Wait a minute. Did you get all that? Because I think my head is going to explode.

I wish I had a picture to show you all of this, but my hands were kinda busy.

Flower tops

It's a good idea to get all your pieces ready before you start any glueing. The centers in this case were yellow mint candies from The Fresh Market. (But m&ms would work, too.) And, if you're like most of the population, and don't have extra bunny corn laying around, you can try using licorice pastels and licorice buttons or check out the nearest candy aisle and get creative.

Licorice Candy Flowers

These licorice candies give more of a wildflower look, but still pretty. I like them (also from the Fresh Market) because their shapes are a little more irregular. You can also get Good & Plenty brand licorice candies in this color pink. They are just a little bit fatter and more uniform in shape.

When all the flowers are made, you can arrange them in a small heavy basket or vase (The heavier, the better, so it doesn't tip over) with at least 2-inch thick styrofoam in the bottom. Also if you decide to transport, keep the flowers from touching each other. The petals can be knocked off easily if they fall into each other.

Gosh, It sounds like I've given you plenty of reasons not to try these. Hopefully the finished product makes up for it.

And, don't worry. I already have an easier flower design in mind for the future. One not influenced by left-over candy pieces : )


Here are some other Mother's Day ideas:
Flower Cupcakes
Mom Tattoo Cupcake