Showing posts with label pops. Show all posts

Sunday, May 3, 2009

Candy Cup Caps

Stuff

Can you guess what I'm going to make with all this stuff?


Candy Cup Caps

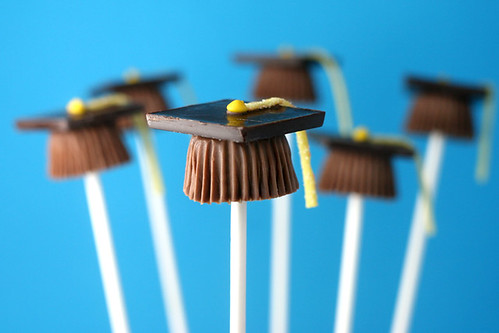
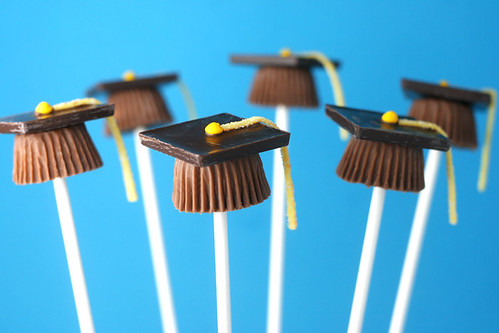
Little bitty candy cup graduation caps. That's what.

I don't even know anyone that's graduating this year. But, because so many of you asked… here they are and hope you like…

Rainbow Candy

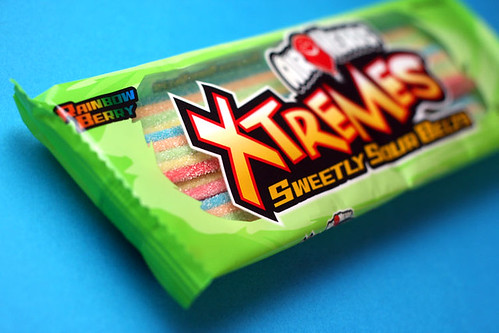
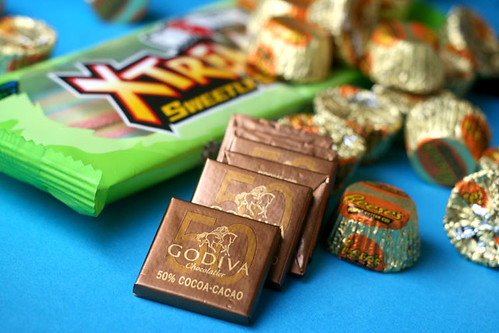
Airheads Extremes Rainbow Berry Sweetly Sour Belts! Ummm… Can you say mouthful? When I found these in the candy aisle at the drug store, I had to grab them. I knew I could find something fun to do with them.

Rainbow Candy Belts

And besides… they're just plain pretty!

Rainbow Candy

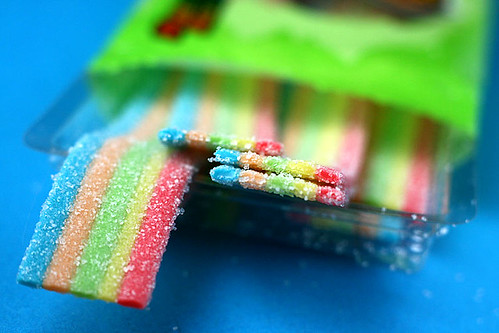
These were definitely the inspiration for the graduation caps. They make perfect tassles and give you color choices at the same time. Just cut apart each color strip with a knife.

Reese's

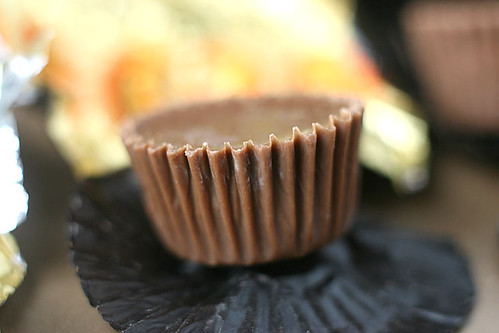
Now, grab a bag of miniature Reese's peanut butter cups. But, before you unwrap them, stick them in the freezer for a few minutes. It will make it easier to remove the wrapper and keep the sides looking pretty when you do.

Reese's

If you remove the wrappers while the candies are room temperature, the sides sometimes come off with the wrapper like this. But that's okay, because these rejects taste good.

Reese's

After you unwrap them, place all the cups on a sheet of wax paper and let them get back to room temperature. When the chill is gone, dip the end of your lollipop stick in some melted candy coating and carefully insert into the candy cups. If they are too cold, the cups will split apart. Just insert the sticks about halfway and let dry.

Caps

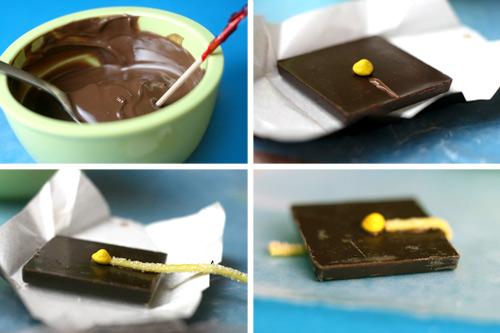
Now, work on the tops. I used these small Godiva chocolate squares. They aren't the cheapest little things, but the proportions were perfect and because they were individually wrapped, the edges were clean. I found them at a store called the World Market a while ago. Just draw a thin line of candy coating on top with a toothpick and glue on a short piece of the candy belt and a rainbow chip sprinkle in the same color to match.

Candy Cup Caps

When the tops are dry, glue them on the candy cups using some more of the candy coating and insert into a styrofoam block to finish drying.

Cute!

But, wait a minute. What if you don't want brown graduation caps?

Or maybe you're just dying to do the whole cake pop thing. Well, you're in luck.

Graduation Cake Pops

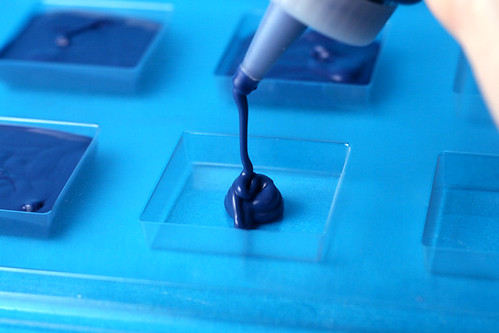
Grab some colored candy melts and get your hands on one of these square candy molds.

Pour some melted candy coating in each square and then drop it on the counter several times to flatten/smooth out the chocolate. Put them in the freezer for a few minutes and it will be easier to pop them out of the molds.

Graduation Cake Pops

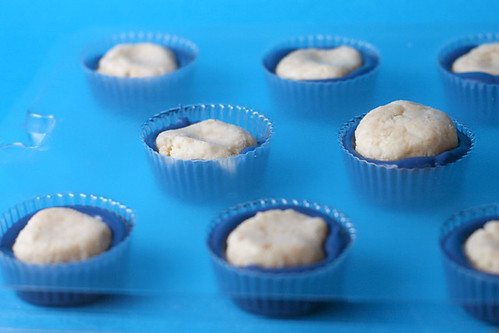
You can also use one of these medium size candy cup molds. I've shown them before with the Cake Bite Method. Just fill the bottom of the cup with some melted candy. Place small, chilled cake ball shapes (smaller than the width of the mold) and push them into the candy coating until the coating inches up the sides. That one on the right is how they look for the Cake Bite Method, but for these they should be almost flush with the height of the molds.

Graduation Cake Pops

Then, cover the exposed areas with more melted candy coating. When covered, insert lollipop sticks about halfway in. By the way, using chilled cake balls here helps the sticks stand up straight when you insert them. Then place these in the freezer for a few minutes and when dry, they'll pop out relatively easy. Don't try to pull them out by the sticks, though. Push them out by pressing on the mold underneath.

Then, you can glue everything on. Instead of rainbow chip sprinkles, use a mini-size m&m because these hats are larger in size than the Reese's version.

Graduation Cake Pops

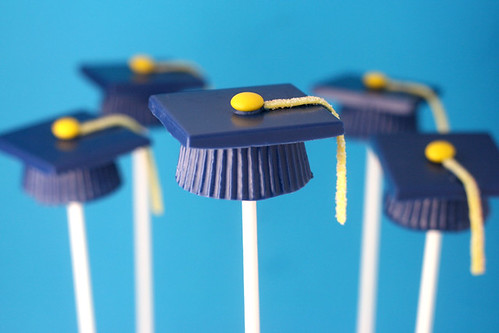
And there you have it… Colored Candy Covered Cake Ball Caps!

P.S. If you can't find Airheads Extremes Rainbow Berry Sour Belts, then try pull apart Twizzlers. They are bigger and round, but if you cut them in half, I think you can glue them, flat side down.


Candy Cup Caps

Mom & Pops

Flower Cake Pops

Mother's Day is next Sunday, so I thought this was as good a time as any to experiment with some Flower Cake Pops. And, I had a bunch of leftover Bunny Candy Corn to get rid of, too. In addition to bunny ears, they make great pastel petals don't you think.

Flower Parts

I'm going to pretend that all of you that made the bunny pops still have these handy, too. You'll need 8-10 pieces for each flower.

Make your cake pops following the basic cake pop instructions, but instead of shaping the pops into balls, make them more oval-shaped with one end flat so you can glue the flower parts on. Also, if you don't want to make the entire recipe into flowers, you can divide the baked cake into fourths and freeze the unwanted sections for later use. Yay!

12 cake pops = 1/4 9 X 13 cake
24 cake pops = 1/2 9 X13 cake
36 cake pops = 3/4 9 X 13 cake
48 cake pops = One 9 X 13 cake

Man… I'm good at math.

Make sure you divide the frosting appropriately also.

Dip the pops in the color candy melts you want for your base. I used white here because it blended in with the white part of the candy corn and camouflaged the gaps a little.

Once dipped, let the cake pops dry standing up in a styrofoam block.

When dry, dip the flat tops back in some of the melted candy coating. This will act as the glue. The coating should be starting to cool off so it takes less time to dry when you attach the pieces.

Now for the balancing act.

Lightly grip the cake pop in your left hand, so your thumb and forefinger can act as a ledge for the candy corn to rest on when you attach them to the top of the pop. If you can do this without letting your hands touch the sides of the cake pop… even better because your body heat can start to melt the sides if you're not careful. It helps a little to let the lollipop stick rest on your leg if you are sitting down.

I know. I know. Sounds like a lot of work. But, I had come this far and they were for… you know… the person who gave birth to me.

Hold them in place long enough for the pieces to set/dry in place and not slide down the side of the pop… which will happen if you remove your hand too soon. Did I mention that this was an experiment? Anyway, when attached, place a tiny bit of candy coating in the center and attach the yellow candies to finish off the flower. Right about here, I realized how happy I was that I decided to only make a dozen of these.

Another method is instead of dipping the top of the pop in candy melts is to apply one petal at a time by dipping the bottom of the candy corn in some of the melted candy coating and then glue it to the top. Wait a minute. Did you get all that? Because I think my head is going to explode.

I wish I had a picture to show you all of this, but my hands were kinda busy.

Flower tops

It's a good idea to get all your pieces ready before you start any glueing. The centers in this case were yellow mint candies from The Fresh Market. (But m&ms would work, too.) And, if you're like most of the population, and don't have extra bunny corn laying around, you can try using licorice pastels and licorice buttons or check out the nearest candy aisle and get creative.

Licorice Candy Flowers

These licorice candies give more of a wildflower look, but still pretty. I like them (also from the Fresh Market) because their shapes are a little more irregular. You can also get Good & Plenty brand licorice candies in this color pink. They are just a little bit fatter and more uniform in shape.

When all the flowers are made, you can arrange them in a small heavy basket or vase (The heavier, the better, so it doesn't tip over) with at least 2-inch thick styrofoam in the bottom. Also if you decide to transport, keep the flowers from touching each other. The petals can be knocked off easily if they fall into each other.

Gosh, It sounds like I've given you plenty of reasons not to try these. Hopefully the finished product makes up for it.

And, don't worry. I already have an easier flower design in mind for the future. One not influenced by left-over candy pieces : )


Here are some other Mother's Day ideas:
Flower Cupcakes
Mom Tattoo Cupcake

Tuesday, April 14, 2009

Cute for a Cure!

I've made a lot of Cupcake Pops. Bunches. But these are the first ones that could make a difference.

Chocolate

I started out making some with brown bottoms.

White

Then I threw in some white ones.

Purple

And lastly, a little purple.

Cupcake Pops

Then, I sprinkled them with a little bit of red and a lot of love.

Cupcake Pops

Voila… An army of cuteness. They're getting ready for battle.

Cupcake Pops

Here they are getting dressed for the occasion.

Fight Cancer

And, it's an important one.

Cupcake Pops to Fight Cancer

Each year, American Cancer Society Relay for Life events take place in communities all over the country. It allows people to participate in the fight against cancer and brings communities together to do so. Basically teams are formed and raise money in fun ways to fight cancer. Then, on the day of the Relay, you and your team take turns walking around a designated track for 24 hours. (I've done it. It's fun.) People raise money for their team in lots of ways. Car washes, raffles, yard sales, and of course bake sales. Ding. ding. ding… that's where these little guys come in to play.

Bake Sale

Now, I know I'm not changing the world here with a few dozen Cupcake Pops, but every little bit helps, right!

And, who knows. Maybe they'll make you want to click on this link, join a Relay for Life Team in your area and join the fight.

Cupcake Pops to fight cancer

Wednesday, April 1, 2009

I have a problem.

Sheep Cake Pops

I can't stop making these pops.

Every time I finish making a batch, I tell myself that's it. No more. I'm done. And, then the next thing I know, I'm buying more lollipop sticks. You know, just in case. The funny thing is, I have several bags of lollipop sticks. I buy them every time I see them. And in different sizes. I don't do this with the other supplies, just the sticks. It's weird. I can't explain it. I guess I'm afraid there will be a stick shortage or something.

But, don't worry, these are the last of the Easter Cake Pops. Promise. Thanks for hanging in there with me.

To decorate the sheep, I used some…
Sugar Pearls
Itty Bitty Heart Sprinkles

Mini Heart Sprinkles

Teeniny tiny. But HUGE cuteness factor.

Sheep Cake Pops

Sugar pearls for the body and tiny hearts for the noses. The ears are brown rainbow chip sprinkles and the eyes are melted candy coating dotted on with a toothpick.

Licorice Bridge Mix

I also used this candy mix (called Licorice Bridge Mix) that I found at the Fresh Market. The buttons were for the head and the pastels, cut in half, were for the legs.

Sheep Cake Pops

All in all… super cute. And also, super crunchy. I had never eaten sugar pearls before and thought they were too high on the crunch to cake ratio for me. But, if you like crunchy cake, you're set.

Now, if you don't like crunchy cake, then you might want to try these instead.

Bunny Cake Pops

So, I lied. These are the last of the Easter Cake Pops.

Little bunny bodies. I about ran out of steam on these. I think you can tell by the effort I put into their faces. But, that's okay, because their bottoms are so cute.

Bunny Bottoms

Little bunny bottoms! Can you stand it? You want to bite them, don't you?

Want to make some? Read the basic cake pop instructions first and then use the decorating tips below for the bunnies and sheep.

Sheep Cake Pops

White Candy Melts
Sugar pearls
Licorice Bridge Mix (buttons for heads and pastels cut in half for legs)
Tiny Heart Sprinkles (noses)
Rainbow Chip Sprinkles (ears)
Paper Lollipop Sticks
Styrofoam Block
Toothpicks
  • Shape the cake mixture into an oval shape. Chill until firm.
  • Dip a lollipop stick in a little of the white chocolate and insert into the body almost halfway.
  • Then dip the sheep body in a bowl of melted white candy coating. Make sure the bowl is deep enough to dip and remove easily.
  • Tap off any excess coating.
  • When you make these, it's best if the candy coating has set out for a few minutes after being heated. Because when you remove the pop from the coating, you will want to go ahead and attach the head, then the feet and then sprinkle on the sugar pearls. It's really a timing thing. If it's too hot, the adornments will slide off and if it has cooled too long, the chocolate will set before you can finish attaching everything. But not to worry, if that happens, then reheat the coating and use it as a glue to attach things.
Note: sprinkle the sugar pearls over a big bowl because these little guys are hard to catch. I'm still finding them in odd places.


Bunny Cake Pops

White Candy Melts
Tic Tac CHILL mints (ears)
Tiny heart sprinkles (noses)
Mini marshmallows (tails)
Pink and blue edible ink pens
Styrofoam Block
Toothpicks
  • Shape the cake mixture into an oval shape. Chill until firm.
  • Dip a lollipop stick in a little of the white chocolate and insert into the body almost halfway.
  • Then dip the bunny body in a bowl of melted white candy coating. Make sure the bowl is deep enough to dip and remove easily.
  • Tap off any excess coating.
  • Insert the tic tac CHILLS in place for the ears. Don't push too far in or they might crack later. Let dry.
  • For the tails, use a knife and make criss-crossing indentions on a mini marshmallow. Don't cut through, just enough to give a cottontail effect. Attach the tails with melted candy coating and let dry.
  • Use a toothpick to place a dot of candy coating for the nose and attach a tiny heart sprinkle.
  • Draw on the faces.
  • Bite their bottoms.
Note: The tic tacs worked for the size, but feel free to try something else with a less minty surprise.


Happy Easter Cake Pops

And now, I'm outta here. I need to go buy more sticks. You know, just in case.